Containerizing and Deploying FastAPI Server on Azure
In this guide, we will walk through the steps to deploy a FastAPI application on Azure using Docker. This process typically involves creating a Docker image of your FastAPI app, pushing it to Azure Container Registry, and then deploying it to Azure App Service. If the aforementioned terms are new to you, don’t worry! Hopefully, by the end of this guide things would become clear.
Prerequisites
- An Azure account. If you don’t have one, you can create a free account.
- Azure CLI installed. You can download it from here.
- Docker Desktop installed. You can download it from here for your operating system. I will be using Windows for this guide, but the steps are similar for other operating systems.
- A FastAPI application ready to be containerized. For this example, I will use a simple FastAPI app since the goal is to demonstrate the deployment process.
Step 1: Create a FastAPI Application
I will create a simple example FastAPI application with three endpoints and no database connections, mock tests, or error handling, the reason being that the purpose of this guide is to explain a specific method of deploying a FastAPI app on Azure using Docker (though the process is, arguably, similar for REST APIs in general).
The three endpoints in my simple FastAPI app are:
- Root endpoint (“/”): Returns a simple message as a JSON.
- Greet endpoint (“/greet/{name}”): Returns a greeting message as a JSON based on the name provided in the URL.
- Square endpoint (“/square/{num}”): Returns the square of any positive integer provided in the URL as JSON.
If you do not already have a FastAPI app, you can copy the following code into a file named main.py. Also, make sure you have fastapi installed in your Python environment if you plan on testing this app locally on your host OS. You can learn how to install FastAPI here.
from fastapi import FastAPI

app = FastAPI()

@app.get("/")
def admin():
    return {"message": "hello admin"}

@app.get("/greet/{name}")
def greet(name: str):
    return {"message": f"Hello, {name}!"}

@app.get("/square/{num}")
def square(num: int):
    if num <= 0:
        return {"error" : "Please enter a positive integer"}
    else:
        return {"result" : num * num}
Step 2: Create a requirements.txt File
We can list the dependencies required to run our FastAPI app in a requirements.txt file so that once we are inside a container, all the required dependencies can be installed by just looking at this requirements.txt file.
Create a file named requirements.txt in your project’s root directory and add the following content to it:
fastapi[standard]
Each dependency should be listed on a separate line. For my simple app this is the only dependency I need in order to run the app, but if you are using other packages such as NumPy, pandas, requests, etc. make sure to list each of them. Depending on your requirements, you may also want to pin your dependencies to a specific version. For a more involved requirements.txt example, see this.
Step 3: Create a Dockerfile
We need to create a Dockerfile to build an image containing our FastAPI app. Create a file named Dockerfile in the root directory of your project and add the following content to it:
# Python image to use.
FROM python:3.12-slim

# Working directory /app
WORKDIR /app

# copy the requirements file used for dependencies
COPY requirements.txt .

# Install any needed packages specified in requirements.txt
RUN pip install -r requirements.txt

# Copy the rest of the working directory contents into the container at /app
COPY . .

ENTRYPOINT ["fastapi", "run", "main.py", "--port", "8000"]
What Is a Dockerfile and What Does Each Instruction Mean?
To put it simply, a Dockerfile is a text file that lists a bunch of instructions that Docker Engine understands and uses to build a container image.
The container image essentially (and ideally :P) packages everything that is needed to run an application. Think about things like the OS, compilers, binaries, libraries, configuration files and anything else that may be necessary to run an application in an isolated environment.
FROM python:3.12-slim
Every valid Dockerfile starts with a FROM instruction followed by the name of the base image which in this case is python:3.12-slim. So we are building our own image on top of an existing base image, in other words our image is comprised of layers and our app is a layer sitting on top of another layer consisting everything that comes from the base image.
WORKDIR /app
The WORKDIR <PATH> instruction is used to create a working directory within our image at the specified path which in our case is /app. The following instructions such as COPY, RUN, and ENTRYPOINT will consider /app as the current working directory. If after this initial WORKDIR /app we were to add another WORKDIR <PATH>, we would have changed the current working directory to the specified path and the following instructions would be executed there.
COPY requirements.txt .
The COPY <src> <dst> instruction in our Dockerfile is used to copy the requirements.txt file from the host’s working directory to the root (.) of current working directory (/app) of our image.
RUN pip install -r requirements.txt
The RUN <command> instruction in our Dockerfile basically runs the specified command, pip install -r requirements.txt, at /app directory within our image which in turn installs the pip packages that we listed in our requirements.txt file.
COPY . .
Copies all the files from the host’s working directory root to the root (.) of current working directory (/app) of our image.
ENTRYPOINT ["fastapi", "run", "main.py", "--port", "8000"]
The ENTRYPOINT [command1, ...] is used to define the main command that runs when the container starts. In this case, it tells the container to run the FastAPI app on port 8000 using fastapi run main.py --port 8000
With this Dockerfile, we are now in a position to build our image.
Step 4: Building a Container Image from Dockerfile
Navigate to the directory containing your Dockerfile and use the docker build command to start the build process. The following is one of the ways in which you can use the docker build command:
docker build -t <IMAGE_NAME> <DOCKERFILE_PATH>
The -t (or --tag) option is used to give a name to the image that is being built. Generally, the <IMAGE_NAME> follows USER_OR_ORGANIZATION_NAME/IMAGE_NAME:TAG format. If you are already in the directory that contains your Dockerfile, you can use . in place of <DOCKERFILE_PATH> otherwise use the relative path to your Dockerfile.
The command I used is:
docker build -t myusername/fastapi-example:v0 .
The time it takes for the build process to finish can vary depending on many factors, including the size of your app and its dependencies. In my case it took 33.9 seconds. Docker will also give some output that indicates the progress of the build process. After the build process has completed, you should get a similar output:
[+] Building 33.9s (11/11) FINISHED                                             docker:desktop-linux
 => [internal] load build definition from Dockerfile                                            0.1s
 => => transferring dockerfile: 468B                                                            0.0s
 => [internal] load metadata for docker.io/library/python:3.12-slim                             1.3s
 => [auth] library/python:pull token for registry-1.docker.io                                   0.0s
 => [internal] load .dockerignore                                                               0.0s
 => => transferring context: 2B                                                                 0.0s
 => [1/5] FROM docker.io/library/python:3.12-slim@sha256:e55523f127124e5edc03ba201e3dbbc85172a  4.9s
 => => resolve docker.io/library/python:3.12-slim@sha256:e55523f127124e5edc03ba201e3dbbc85172a  0.0s
 => => sha256:d6413c75b31d1e291ea1b03e04cc390349f359145bbfe370f768d91c15e47a89 250B / 250B      0.1s
 => => sha256:ebb07cd170cc8bb945a29bb5d838d9572bbf28233b4a5c0b2ce678dbbcd59d 13.66MB / 13.66MB  1.2s
 => => sha256:25244d620b7469e583336e7c7018b96cbfe7aa52bd295bd1c85178797030a520 3.51MB / 3.51MB  0.7s
 => => sha256:dad67da3f26bce15939543965e09c4059533b025f707aad72ed3d3f3a09c66 28.23MB / 28.23MB  1.8s
 => => extracting sha256:dad67da3f26bce15939543965e09c4059533b025f707aad72ed3d3f3a09c66f8       1.8s
 => => extracting sha256:25244d620b7469e583336e7c7018b96cbfe7aa52bd295bd1c85178797030a520       0.3s
 => => extracting sha256:ebb07cd170cc8bb945a29bb5d838d9572bbf28233b4a5c0b2ce678dbbcd59d10       0.9s
 => => extracting sha256:d6413c75b31d1e291ea1b03e04cc390349f359145bbfe370f768d91c15e47a89       0.0s
 => [internal] load build context                                                               0.0s
 => => transferring context: 498B                                                               0.0s
 => [2/5] WORKDIR /app                                                                          0.4s
 => [3/5] COPY requirements.txt .                                                               0.1s
 => [4/5] RUN pip install -r requirements.txt                                                  17.9s
 => [5/5] COPY . .                                                                              0.1s
 => exporting to image                                                                          8.8s
 => => exporting layers                                                                         6.7s
 => => exporting manifest sha256:088a6f8d0a641c118c03725c8405bfdcbbf2f68fb4361a26f8e4ab199ab77  0.0s
 => => exporting config sha256:932ddce0659c18b3406a4543e8a58b6980775b5f3b9b837fd03cc0e87b70e5e  0.0s
 => => exporting attestation manifest sha256:788c2b2784b511e29ca1d9798fd5b3df4d016cff0009f20d5  0.0s
 => => exporting manifest list sha256:9adf470bc7626763efebda5b323de47cceaba518f451f9e6115d443d  0.0s
 => => naming to docker.io/myusername/fastapi-example:v0                                         0.0s
 => => unpacking to docker.io/myusername/fastapi-example:v0                                      2.0s
NOTE: Before moving forward, ensure that you have an active Azure account and Azure CLI installed on your host machine. Refer to the Prerequisites section if you are unsure about how to get either of these.
Step 5: Creating a Resource Group on Azure
We need to create a Container Registry and an App Service resource on Azure to eventually push and deploy a containerized application but before creating the aforementioned resources we need to create a Resource Group on Azure.
a Resource Group gives us a way to group related resources. For example, you may wish to group resources based on business functions, in which case you may create a resource group for, say, subscription management services, another for weather forecasting services, and yet another for image recognition services. This can be helpful from a separation of concerns and cost management perspective.
Use the command below to log into your Azure account:
az login
After completing the login, use the following command to create a new resource group:
az group create --name <RESOURCE_GROUP_NAME> --location <LOCATION_NAME>
for example, I used az group create --n demo_apps --l eastus to create a resource group named demo_apps in the eastus location. On successful creation you should see a JSON response like the one below:
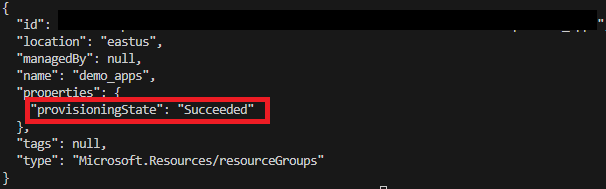 [Figure 1] az group create JSON response
Step 6: Creating a Container Registry Resource on Azure
Now, we can create a Container Registry and assign it to the resource group we made in the previous step.
A Container Registry on Azure is a resource that’s used to store container images, in other words, it is a repository of images.
Use the command below to create a new Container Registry:
az acr create --resource-group <RESOURCE_GROUP_NAME> --name <REGISTRY_NAME> --sku Standard --role-assignment-mode 'rbac-abac' --dnl-scope TenantReuse
The <RESOURCE_GROUP_NAME> must be the name of a resource group that already exists, I used demo_apps (the name of the resource group we made in the previous step). The <REGISTRY_NAME> is the name we want to give to this registry.
The flags --role-assignment-mode and --dnl-scope TenantReuse are optional but I recommend using them even if you are not much concerned about security. The value 'rbac-abac' for --role-assignment-mode will enable fine-grained access control for this registry and defining a --dnl-scope can prevent subdomain takeover attacks, for now. You can read more about these options here.
For example, to create a Container Registry one may enter:
az acr create --resource-group demo_apps --name demoapp --sku Standard --role-assignment-mode 'rbac-abac' --dnl-scope TenantReuse
After the registry is created, you should receive a somewhat lengthy JSON response. Take note of loginServer value given in the response. In the next step we will use it to re-tag the container image.
Step 7: Pushing an Image to Container Registry
In order to push images to a registry, you must:
- Log into that registry.
- Re-tag your container image
Logging into a Container Registry
Before logging into the registry, make sure you are also logged into your Azure account through Azure CLI. Use az login to log into your Azure account and the following command to log into the registry to which you want to push your container image:
az acr login --name <REGISTRY_NAME>
Here <REGISTRY_NAME> is the name of your registry that you entered in the previous step (step 6). On success, you should receive a “Login Succeeded” response message.
Re-Tagging a Container Image
Re-tag the docker image by using the docker tag command. The goal here is to prefix your image name with the loginServer string that you received on creating the registry to which you wish to push your image. You can use the az acr list command to find the loginServer string in case you did not note it down.
For example, to re-tag an image by prefixing it with the loginServer string, use the following command:
docker tag myusername/fastapi-example:v0 <ACR_LOGIN_SERVER>/fastapi-example:v0
After this, you can use the docker push command to push your image to Azure Container Registry instead of Docker Hub:
docker push <ACR_LOGIN_SERVER>/fastapi-example:v0
Make sure to replace <ACR_LOGIN_SERVER> with the actual loginServer string. It should look something like myregistryname-123ab45c.azurecr.io.
Fixing the “push access denied” Issue
If you were not able to push the re-tagged image using the docker push command and received a message that went something like this:
push access denied, repository does not exist or may require authorization: server message: insufficient_scope: authorization failed
The problem is likely to be any of the following:
- There is a typo in the image name provided to
docker pushcommand. - There is a typo in the login server that was used to tag the image.
- The
az acr login --name <REGISTRY_NAME>command succeeded but it did not update your Docker authorization so when you enterdocker pushit lacks the necessary authorization to push local images to the desired Azure Container Registry.
To fix the problem described in point 3 you will need the automatically generated password of your desired Azure Container Registry. This information is only available to admin users, so if you think that your role is not that of an admin and this is something that members of your organization’s operations team should handle, please reach out to them. Otherwise you can enable admin access for your account and fix the issue yourself by doing the following:
- Log into Azure portal from a browser.
- Navigate to: Home -> Container Registry and select the registry to which you were trying to push to.
-
After you have selected your desired registry, Select “Access keys” in the “Settings” dropdown. The picture below illustrates the steps we have taken so far:
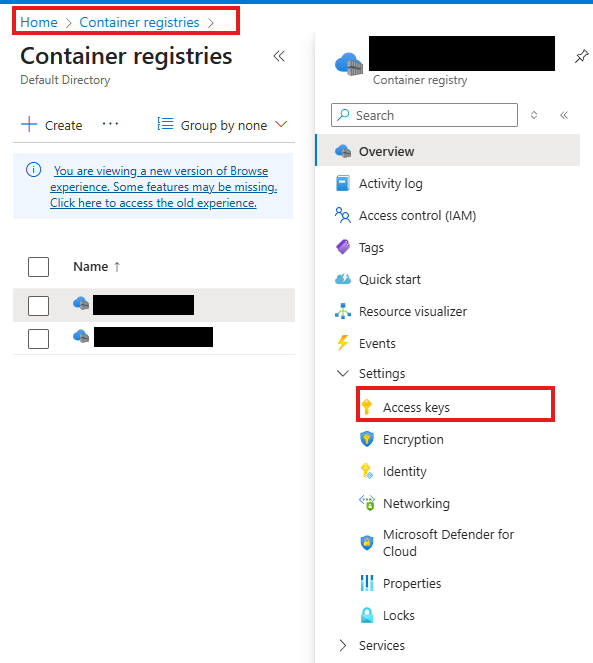 [Figure 2] Azure Container Registry web interface
 -
Check the “Admin user” checkbox pointed by the arrow in the image below:
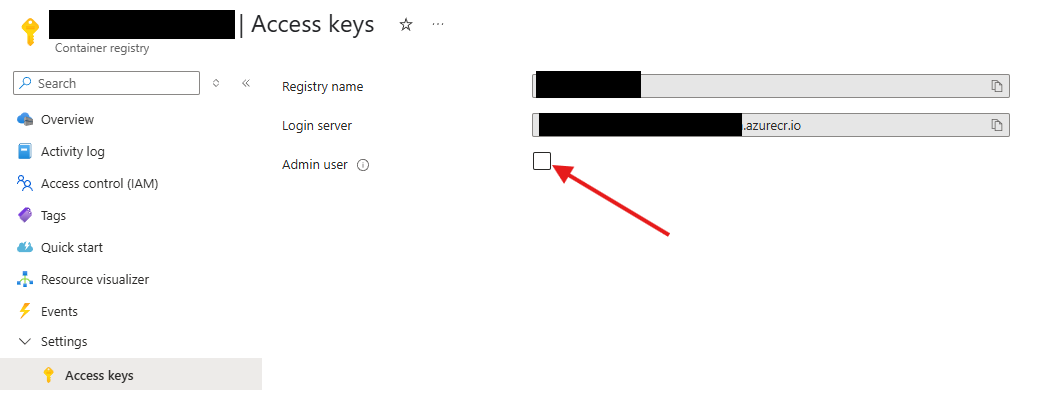 [Figure 3] Azure Container Registry access keys web interface
Now you should see the username and the passwords associated with this registry.
- Enter the command
docker logoutto log out of your personal/organization’s Docker account. - Enter the command
docker login <ACR_LOGIN_SERVER>. Here make sure to replace<ACR_LOGIN_SERVER>with the login server string of your desired Azure Container Registry. - Now you will be prompted to enter a username and then a password. Make sure to enter the username and password that was displayed after you checked the “Admin user” checkbox.
- Once you get the “Login Succeeded” message, try to push your image to the registry again using the
docker pushcommand.
Step 8: Creating an Azure Web App Service
In this step we will create a new Azure Web App which will ultimately host our containerized FastAPI app.
Azure Web Apps are a specific type of Azure App Service that focuses on hosting Web Applications. They work best for deploying web apps that do not experience extremely high load and have low storage needs.
Follow the steps below to provision an Azure Web App that uses a container image from your preferred registry:
-
Log into Azure portal from a browser. Navigate to: Home -> App Services. Select the “+ Create” dropdown on top left and choose “+ Web App” as shown in the picture below:
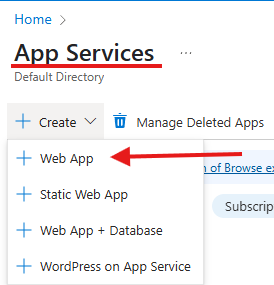 [Figure 4] Azure App Services “+ Create” options
 -
In the “Basics” tab, fill the necessary details:
- Subscription: Choose your subscription.
- Resource Group: From the dropdown, choose the resource group you created. In step 5, I created a resource group named
demo_appsso that is what I chose. - Name: Give a unique name to your Web App instance.
- Publish: Choose “Container”.
- Operating System: Choose “Linux”.
- Region: Choose the same region as your resource group. In my case it is East US.
- Linux Plan (East US): Select “Create New” and enter a name for your App Service Plan.
- Pricing plan: Choose your preferred pricing plan. For simple web apps “Basic B1” works well.
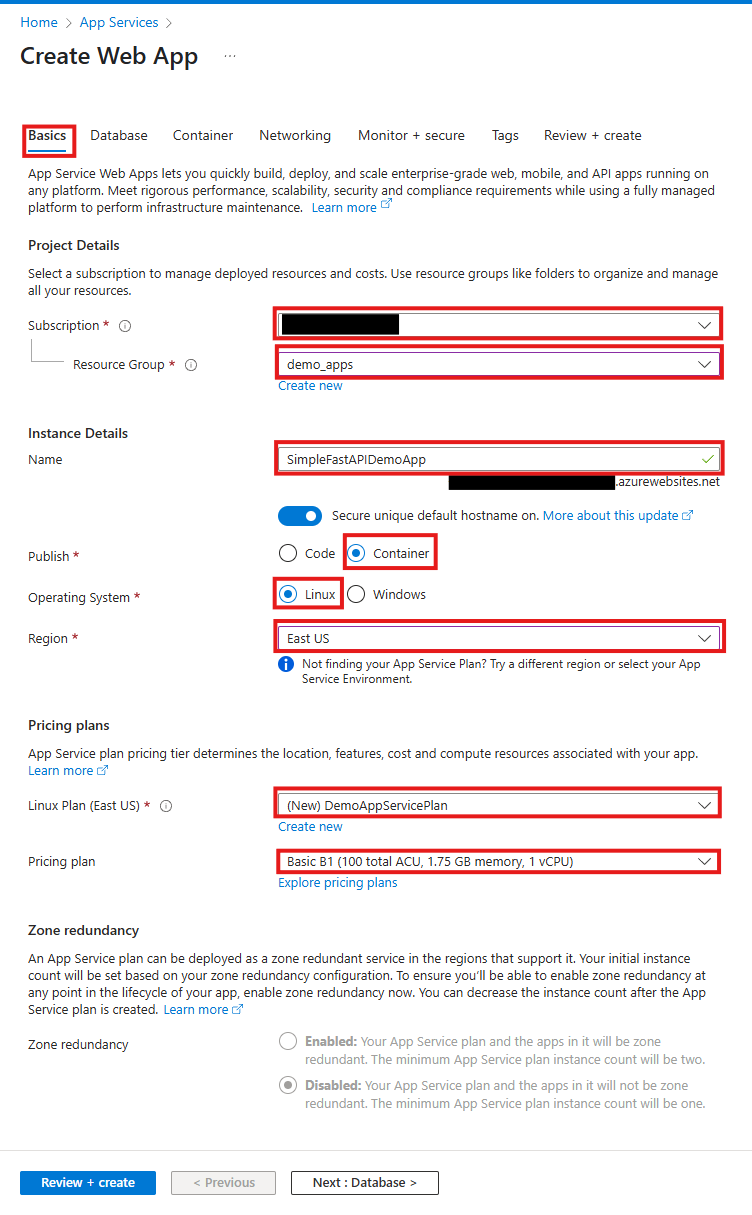 [Figure 5] Create Web App “Basics” tab
 -
Next, Go to the “Container” tab and fill the necessary details:
- Sidecar support: Keep this enabled. This option allows adding extra containers to this deployment at a later time that may provide extra services alongside the main container. It also allows entering the exact port number at which our app listens. You can read more about this option here.
- Image Source: Choose “Azure Container Registry”.
- Name: It is considered good practice to name the container “main” if this container hosts the actual application and not some additional service such as telemetry monitoring, etc.
- Registry: Enter the name of the registry with the image you want to deploy.
- Authentication: Choose “Managed Identity”.
- Identity: Unless you know the exact identity you want to choose beforehand, select the identity prefixed with new here.
- Image: Enter the name of your image here.
- Tag: Enter the tag of your image here.
- Port: Enter the port your containerized app listens on.
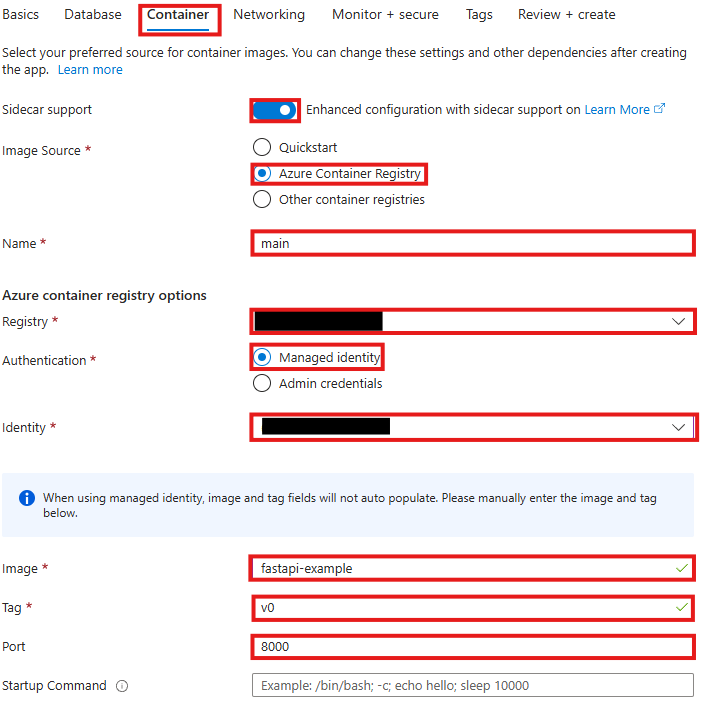 [Figure 6] Create Web App “Container” tab
 -
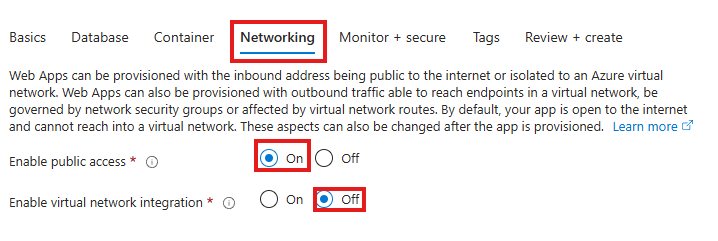
Go to the “Networking” tab and select:
- Enable public access: Choose “On”.
- Enable virtual network integration: Choose “Off”.
 [Figure 7] Create Web App “Networking” tab
 -
Finally, go to the “Review + Create” tab. Here you can review all the details you have entered for creating the Web App. If everything looks good, select create on the bottom left.
 [Figure 8] Create Web App “Review + Create” tab
At this point, deployment of your Web App instance should begin. It typically takes around 10 minutes before the app becomes accessible via the default domain URL.
You can find the default domain URL by navigating to:
Home -> <WEB_APP_INSTANCE_NAME> -> Overview. Here <WEB_APP_INSTANCE_NAME> is the “Name” you entered in the “Instance Details” section of the “Basics” tab during Web App creation (see Figure 5).
Step 9: Configuring Registry Access for the Managed Identity
If you chose the new Managed Identity instead of an existing one, as suggested, in the “Azure container registry options” section of the “Container” tab during Web App creation (see Figure 6), you will have to assign two roles to this Managed Identity so that resources with this Managed Identity (e.g. the Web App we just deployed) can see and pull images they require from registries. The two roles are:
Container Registry Repository ReaderAcrPull
Adding Container Registry Repository Reader Role for the Managed Identity
In this section, I will demonstrate how to add the Container Registry Repository Reader role for a Managed Identity but the steps are similar for adding the AcrPull role.
-
On the Azure web portal, navigate to: Home ->
-> Access control (IAM) and select "Add role assignment" under the "Grant access to this resource" card. Here is the name of the registry from which your Web App is pulling its required image: 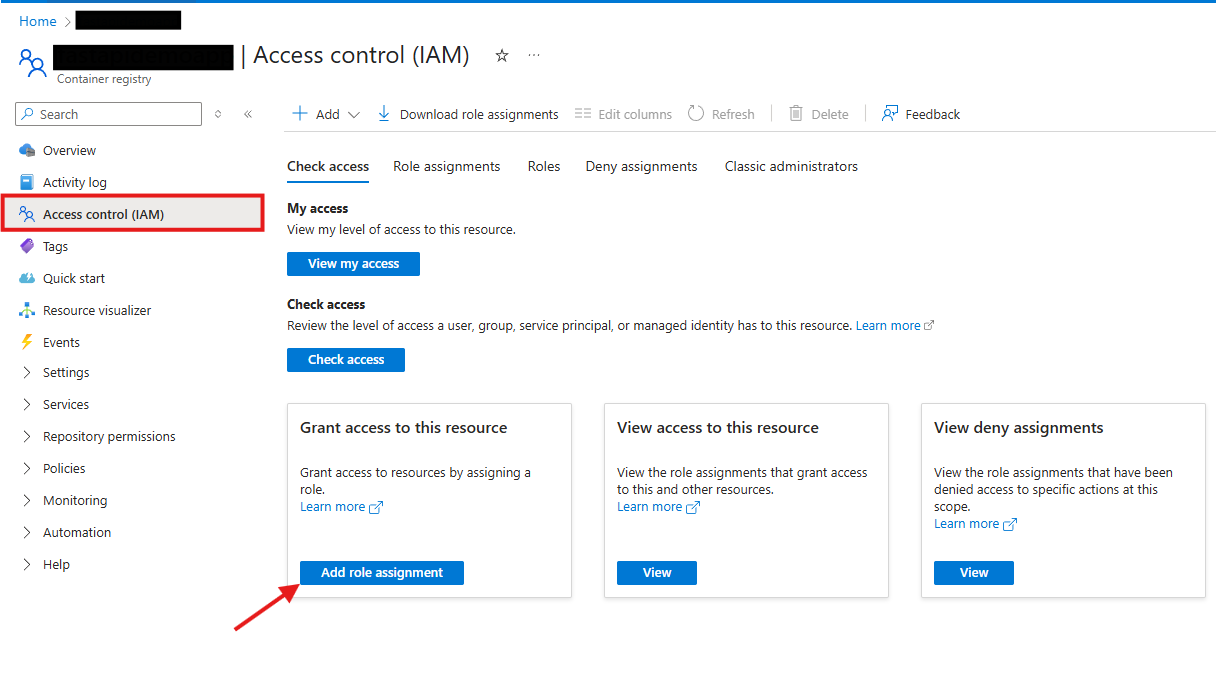 [Figure 9] Container Registry access control page
 -
On the “Add role assignment” page, scroll down, select “Container Registry Repository Reader” and click “Next”:
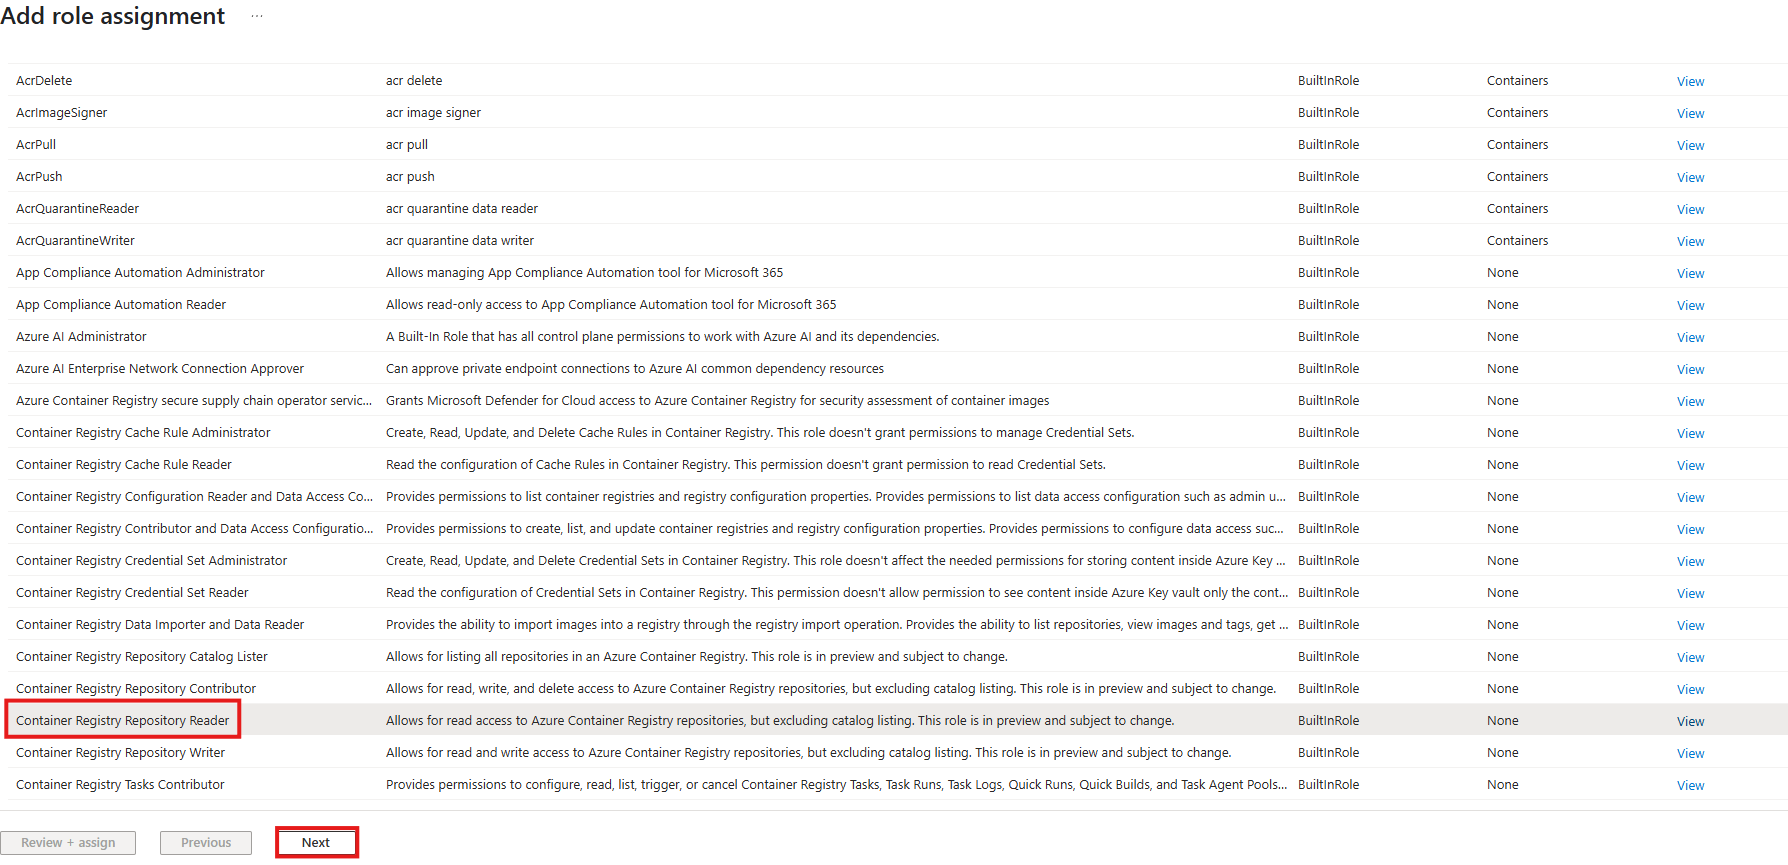 [Figure 10] Container Registry role assignment page’s “Role” tab
 -
Now you should be on the “Members” tab of the “Add role assignment” page. Select “Managed Identity” and click “+ Select members”:
 [Figure 11] Container Registry role assignment page’s “Members” tab
 -
On the “Select managed identities” popup, fill the necessary details:
- Subscription: Choose your subscription.
- Managed Identity: Choose “User-assigned managed identity”.
- Select: Enter the name of your Managed Identity and select it. After selecting it, make sure it shows up under the “Selected members” section.
After entering the necessary detail and selecting the appropriate Managed Identity, click “Select”:
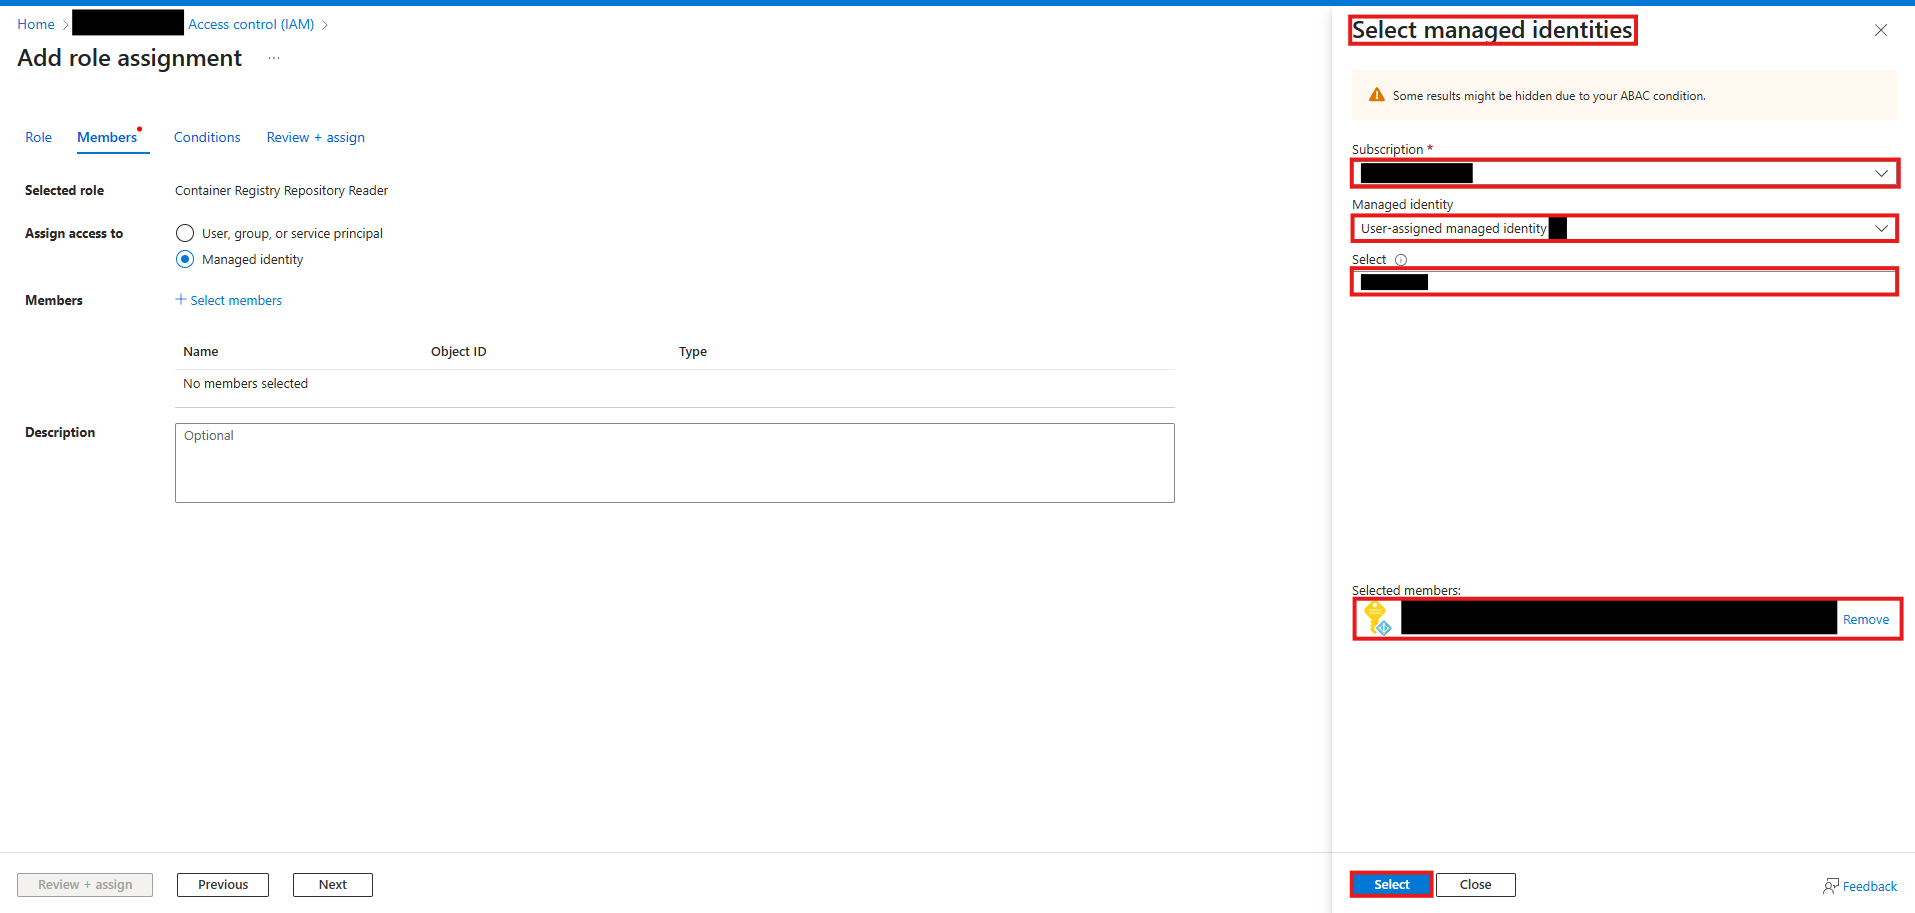 [Figure 12] “Select managed identities” popup
 -
Finally, click the “Review + assign” button. This will take you to the “Review + assign” tab and if everything looks good, click the “Review + assign” button again.
 [Figure 13] Container Registry role assignment page’s “Review + assign” button
Make sure to repeat these steps and add the AcrPull role for your Managed Identity.
Now your Web App’s user-assigned Managed Identity has all the necessary accesses it needs.
Step 10: Restarting and Accessing Azure Web App
With the Managed Identity’s role assignments updated, we are now very close to finally being able to access our FastAPI app, live on the internet! All we need to do is restart our Web App and verify the container is running:
-
Navigate to: Home ->
-> Overview and select "Restart". While the restart itself may take less than a minute, getting the container up and running can take ~10 minutes.  [Figure 14] Web App’s Overview page header
 -
Next, go to Deployment -> Deployment Center, and open the Containers tab. In the “Status” column, look for the value “Running”. If it says “Terminated”, click on it to view a JSON response. This response includes a key named
"TerminationReason"that explains why the container failed to launch.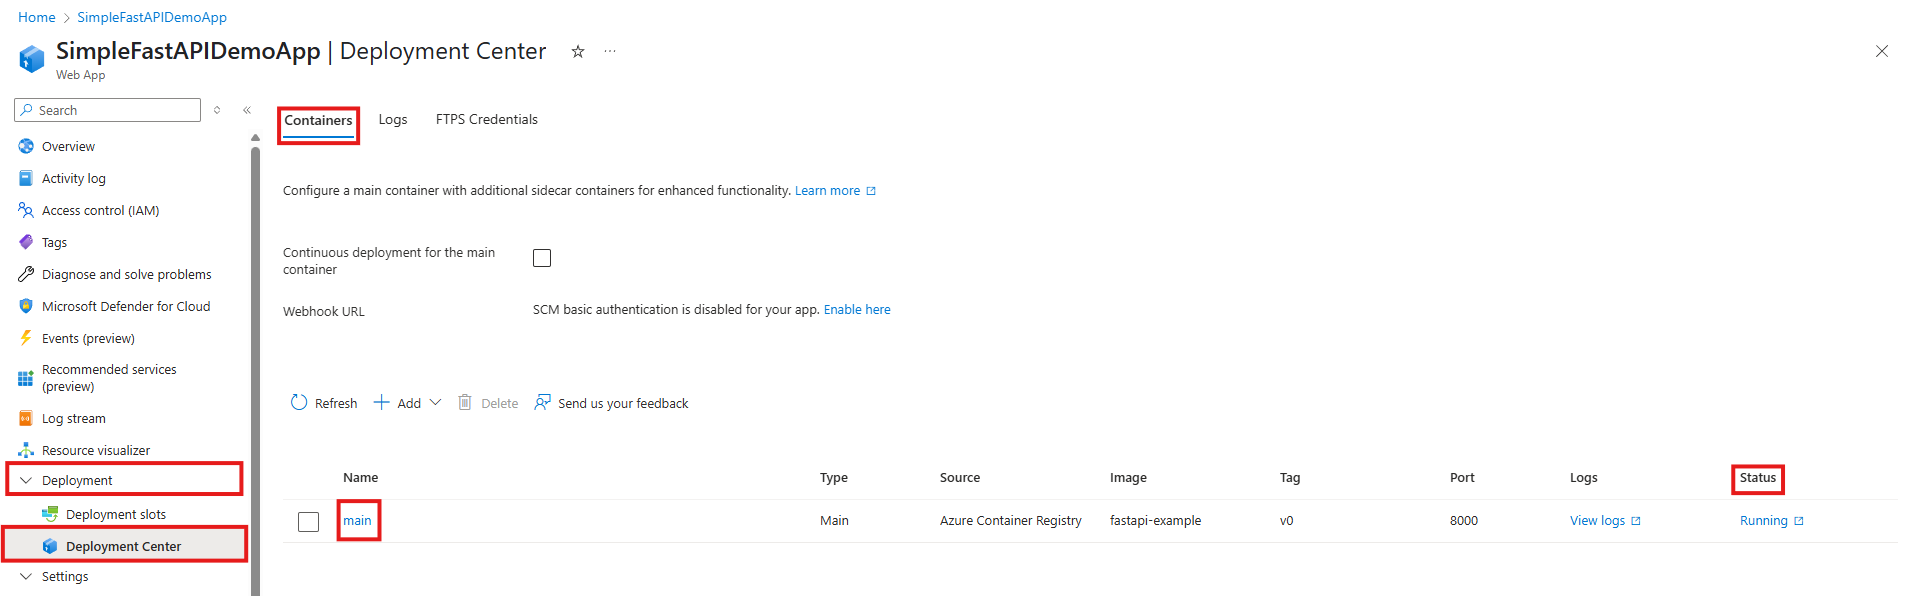 [Figure 15] Web App’s Deployment Center page
 -
Go back to the Overview blade and click on the default domain to access your FastAPI app.
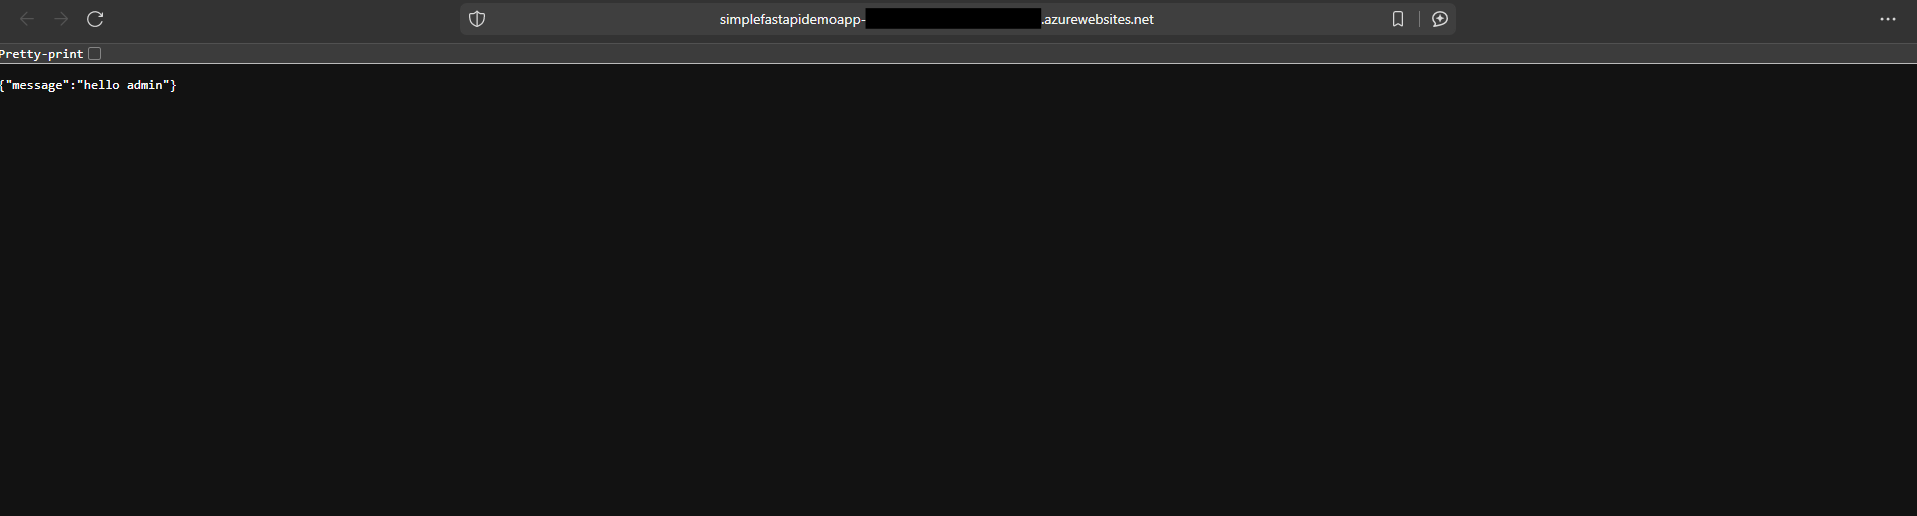 [Figure 16] Root endpoint of FastAPI app introduced in step 1
Conclusion
Please keep in mind that the API deployed in this guide is still quite unsafe. For example, if you were to disclose the endpoint URLs in an open-source client application, a simple script like the one below can not only trigger Denial of Service but might also make your cloud subscription cost go up:
import requests

while True:
    requests.get("YOUR_API_URL")
Setting up quota policies, enabling client request authorization via tokens, etc. is a step towards making your deployed app secure. I did not go over these steps in this guide, so make sure to not disclose the URLs publicly!
I hope you had fun reading this guide, more importantly, I hope that now you at least have rudimentary understanding of the utility that containerization tools like Docker and cloud services like Azure provide, in case you weren’t familiar already. If you have any questions or find any mistakes that I made, please let me know in the comments.
Thanks for reading.